Notifications: Introduction
The Notifications module helps you quickly implement notifications feature in your app. Here're some highlights of this module:
- Remote (push) notification
- The module is currently compatible with OneSignal and Firebase Cloud Messaging (FCM). Both are free and popular cross-platform push notification delivery services.
- Local notification
- One-time and repeat notifications.
- Fully-customizable notifications: sounds, icons, badge, light, vibration, lock-screen visibility, etc. (feature availability varies between iOS and Android)
- Supports notification custom action buttons.
Notification Category
Unifies Android notification category (channel) and iOS notification category, makes it easy to customize and organize notifications in your app.
Fully supports notification channels introduced and required since Android O, while maintaining backward-compatibility with older Android versions, where notification channels don't exist.
Fully supports notification channel groups introduced since Android O.
Friendly editor
- Makes it easy to setup remote notification service, manage categories, adding resources, etc.
Easy Mobile's notification API works on iOS 10 or newer (more than 95% of iOS devices) and Android API 14 or newer (more than 99% of Android devices).
Understanding Notifications
A notification is basically a message that is displayed by the system outside of your app's UI to provide the user with some timely information about your app. The user can open a notification to bring your app to foreground and take further actions if they wish.
If your app is in foreground at the moment the notification is delivered, then the notification won't be posted (in other words, it will be silenced). Instead, its data will be sent to the app directly in form of an event.
Notifications appear to users in different locations and formats, plus their appearance varies slightly between iOS and Android, and among different versions of these platforms. Depending on the current state of your device, notifications can appear in the status bar (Android), the notification center (iOS), or the lock-screen. Below are the typical anatomies of iOS and Android notifications.
iOS Notification Anatomy
Here's a typical iOS notification with basic details.
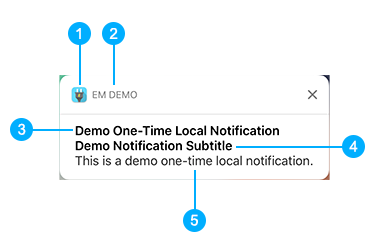
- Small icon: provided by the system
- App name: provided by the system
- Title: the notification title provided by you
- Subtitle: the optional notification subtitle provided by you
- Body: the main notification message provided by you
Android Notification Anatomy
Here's a typical Android notification with basic details.
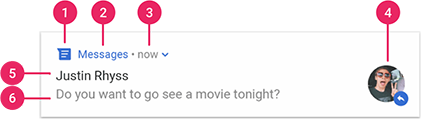
- Small icon: required, provided by you (if no valid icon specified, Easy Mobile automatically uses the fallback icon, which is a bell)
- App name: provided by the system
- Time stamp: provided by the system
- Large icon: optional, provided by you (this is usually used only for contact photos; do not use it for your app icon)
- Title: the notification title provided by you
- Body: the main notification message provided by you
You can learn more about iOS notifications here and Android notifications here.
Notification Custom Actions
Beside basic content, you can optionally attach additional action buttons to the notification for specific tasks. Using unique action IDs, your app can acknowledge the action selected by the user and response accordingly, e.g. open a particular UI for the user to perform further interaction.
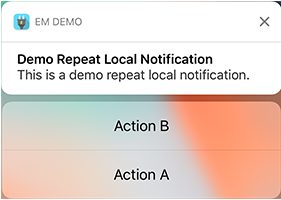
A notification on iOS can have up to 4 action buttons. However, the number of actions actually displayed depends on how and where the notification is displayed. For example, banners display no more than two actions. Here's an example of an iOS notification with 2 action buttons, Action A and Action B.
A notification on Android can have up to 3 action buttons. Here's a typical Android notification with 2 action buttons, REPLY and ARCHIVE.
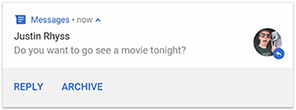
On Android, Easy Mobile supports notification actions on API 23 or newer.
Local Vs. Remote Notifications
Local notifications are notifications scheduled by your app locally. Your app configures the notification content, specifies a trigger condition, and passes these details to the system, which then handles the delivery of the notification when the trigger condition is met.
One-time vs. Repeat local notifications
A one time notification is delivered only once. A repeat notification is delivered once every time the repeat interval passed. Both notification types survive device reboots. If the delivery time is past at the moment the device has finished reboot, the notification will be delivered immediately.
Remote notifications are sent (pushed) to user devices from a remote server (be it your own server or a 3rd party server like OneSignal's) via the Apple Push Notification service (APNs) on iOS, or the Google Cloud Messaging service (GCM) on Android.
Notification Categories
Easy Mobile's cross-platform notification category unifies Android notification channel/category and iOS notification category, providing a simple and convenient way to customize and organize notifications in your app. You can use category to control multiple aspects of notifications including importance, light, vibration, sound and action buttons (configuration varies between platforms, e.g. importance and light are Android-only). All notifications posted to the same category share the same customization. Every time you schedule a notification, simply set the category it belongs to and all the settings of that category will be applied to the notification automatically. Using categories is therefore a more intuitive and efficient way to customize and organize notifications. You can have multiple categories in your app, each controls a different type of notifications. For example, you can have a category dedicated for game event notifications, and another category for user (chat) message notifications.
Notification Categories on iOS
On iOS, cross-platform categories automatically translate to native notification categories, taking only the information on custom actions because iOS notification categories are mostly responsible for configuring custom actions. About the other settings of the cross-platform category, those are applicable on iOS (e.g. sound) will automatically be applied when a notification of this category is scheduled.
iOS notification categories are not visible to users. You can learn more about them here.
Notification Categories on Android
On Android 8.0 Oreo (API level 26), a new feature is introduced which is notification channels/categories. Starting in this version, all notifications must be assigned to a channel or it will not appear. Notification channels offer the ability to group notifications, and allow users to control the visual and auditory options of each channel from the Android system settings.

The Android user interface refers to channels as "categories".
On Android 8.0 and newer, Easy Mobile's cross-platform notification categories automatically translate to native notification channels. Most settings are applicable to Android channels, except the custom actions (Android notification channels are not responsible for custom actions). When a local notification is scheduled, it will be assigned to the native notification channel, and the custom actions (if any) found in its cross-platform category are automatically added when constructing the notification.
On Android 7.1 (API level 25) and lower, there're no notification channels. When a local notification is scheduled, individual settings will be read from its cross-platform category and applied automatically when constructing the notification.
You can learn more about Android notification channels/categories here.
Default Notification Category
For notifications to work consistently across iOS and Android platform, your app requires at least one notification category. Easy Mobile has a built-in default category. If you're scheduling a local notification and not specifying any category, then the default one will be used. This default category can be customized from the module settings, but it cannot be removed.
Notification Category Groups
You can organize your notification categories into category groups. On Android category groups directly translate to native channel groups. Below is an example of how notification channels are organized into groups in the system settings on Android.
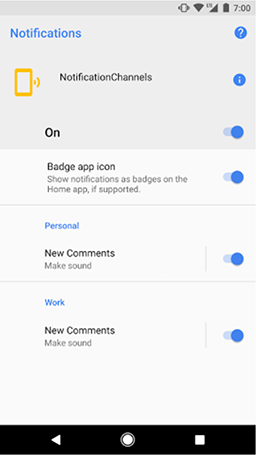
Notification category groups don't have any effect on iOS.
GDPR Compliance
We recommend you to read the Privacy chapter first to gain a comprehensive understanding of the tools and resources offered by Easy Mobile to help your app get compliant with GDPR, including the consent dialog and the consent management system.
Remote notification is one of those services affected by the GDPR, because most providers (including OneSignal and Firebase) need to collect a device's unique identifier of one kind or another to deliver messages to that device. Therefore it may be advisable to get the user consent (explicit opt-in) before initializing the service, especially in EEA region. Easy Mobile provides a native, multi-purpose dialog which you can use to collect user consent for the remote notification service as well as other relevant services in your app.
Allowing the user to provide and manage consent for all services via a single interface (dialog) is advisable in terms of user experience, because the user may find it irritating being presented multiple dialogs asking consent for various things.
Once the push notification consent is collected, you can communicate it to the Notifications module using the GrantDataPrivacyConsent or RevokeDataPrivacyConsent methods (see Scripting/Working with Consent). The consent will then be automatically forwarded to the selected remote notification service during its initialization. Therefore it is important to collect the consent before initializing the remote notification service. Practically, this means collecting consent before initializing Easy Mobile runtime, which will automatically initialize the remote notification service (provided that the Auto Initialization feature of the Notifications module is enabled). The next sections detail how consent is applied to each remote notification service when it is used in your app.
Currently there's only module-level consent available to the Notifications module. Because consent is only applicable to remote notification service, and only one service can be selected at a time, providing vendor-level consent would be irrelevant. Instead, the module-level consent (if any) will be used for whichever service being selected.
OneSignal
If OneSignal is selected as the remote notification provider in your app, the Notifications module will perform appropriate actions according to the specified consent before initializing OneSignal service. The table below summarizes the actions taken in each case.
| Consent Status | Actions Taken |
|---|---|
| Granted | Calling OneSignal.SetRequiresUserPrivacyConsent(true); and OneSignal.UserDidProvideConsent(true); to inform OneSignal that the consent was granted and then initialize it. |
| Revoked | Calling OneSignal.SetRequiresUserPrivacyConsent(true); and OneSignal.UserDidProvideConsent(false); to inform OneSignal that the consent was not granted/revoked. |
| Unknown | Do nothing regarding consent. The initialization of OneSignal is carried out as normal (the "pre-GDPR" behavior). |
Reference: https://documentation.onesignal.com/docs/unity-sdk#section--setrequiresuserprivacyconsent-
Firebase Cloud Messaging
Once the FCM SDK is imported into your project, it will automatically perform initialization in runtime, during which it generates an Instance ID, which is used as a registration token within FCM. When an Instance ID is generated the library will upload the identifier and configuration data to Firebase. Therefore if you want to get an explicit opt-in before using FCM, you must disable its auto initialization. Please follow the instructions in the Prevent auto initialization chapter in the FCM documentation for that purpose.
If the consent communicated to the Notifications module is Granted, it will automatically re-enable FCM during the initialization process by calling the following command:
Firebase.Messaging.FirebaseMessaging.TokenRegistrationOnInitEnabled = true;
Summary
If you want to get an explicit opt-in before using FCM, you must disable its auto initialization. If the consent provided to the Notifications module is Granted, FCM will be re-enabled automatically during initialization.
If you disable the FCM auto initialization and the consent provided to the Notifications module is Revoked or Unknown, the FCM service won't be re-enabled and it won't function.
If you don't want to get an explicit opt-in before using FCM, you can ignore all described actions. The FCM service will be initialized automatically as normal.