Using Easy Mobile
Overview
Using Easy Mobile involves 3 steps:
- Configuring the plugin using the built-in Settings interface
- Initializing the plugin runtime
- Making appropriate API calls from script (or using visual scripting actions)
Main Menu
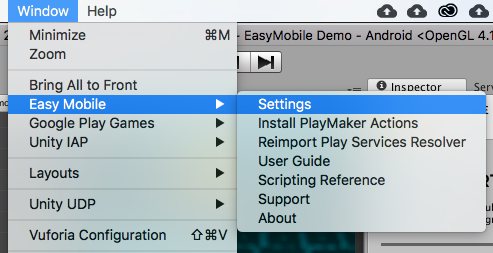
After importing Easy Mobile, there will be a new menu added at Window > Easy Mobile from which you can open the Global Settings interface to configure modules as well as access other resources.
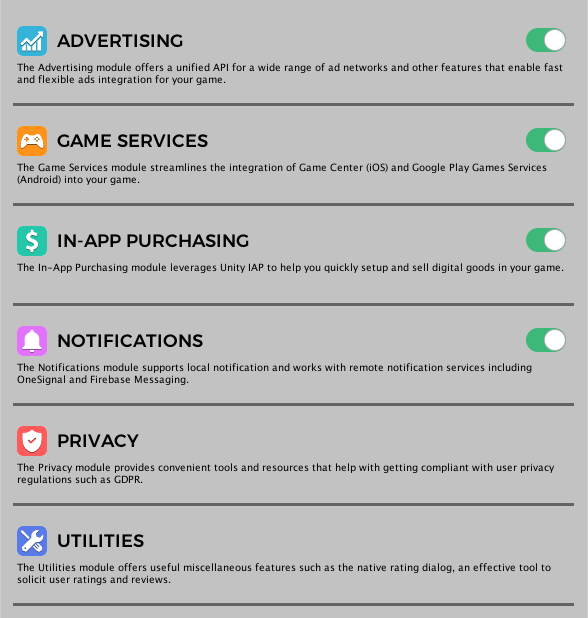
Global Settings
The Global Settings interface is the only place you go to configure the plugin. Here you can control everything including toggling module on or off, providing ads credentials, adding leaderboards, creating a product catalog, etc.
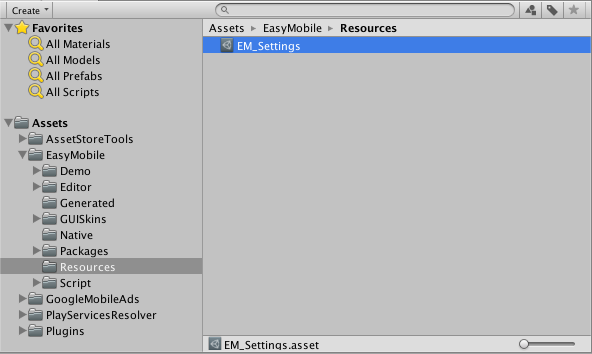
All these settings are stored in the EM_Settings object, which is a ScriptableObject created automatically after importing the plugin and is located at Assets/EasyMobile/Resources. You can also access this EM_Settings class from script and via its properties accessing each module settings in runtime.
Initializing
Easy Mobile runtime must always be initialized, either automatically or manually, before its API can be used.
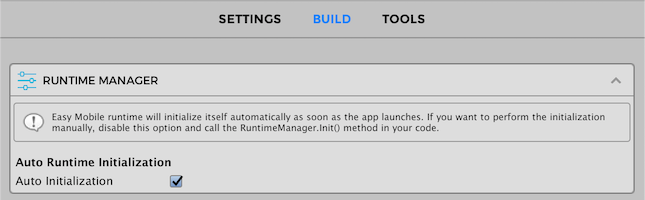
Auto Runtime Initialization
Easy Mobile is capable of initializing itself thanks to a feature called Auto Runtime Initialization, which is enable by default. You can toggle this feature in the RUNTIME MANAGER section in the BUILD tab. Once enabled, the Easy Mobile runtime will be initialized automatically as soon as the app launches, thus allowing you to use Easy Mobile API without worrying about this initialization step.
The Auto Runtime Initialization feature has been added since Easy Mobile Pro 2.11.0. This feature can be enable even if your scripts include manual initialization code (e.g. you are upgrading from an older version), because Easy Mobile is smart enough to ignore subsequent calls once it has been initialized.
Manual Runtime Initialization
If you want to control when to initialize Easy Mobile in your code, you can disable the Auto Runtime Initialization feature and perform the initialization manually. Since the initialization must be done before the Easy Mobile API can be used, it is still advisable to do it as soon as your app launches. This will also allow automatic services such as ad loading to start soon and the ads will be more likely available when needed. Practically, this means attaching the initializing the following script to some game object in the first scene of your app.
To initialize simply call the Init method of the RuntimeManager class. This method is a no-op if the initialization has been done so it's safe to be called multiple times. You can also check if Easy Mobile has been initialized using the IsInitialized method.
using UnityEngine;
using System.Collections;
using EasyMobile; // include the Easy Mobile namespace to use its scripting API

public class EasyMobileInitializer : MonoBehaviour
{
    // Checks if EM has been initialized and initialize it if not.
    // This must be done once before other EM APIs can be used.
    void Awake()
    {
        if (!RuntimeManager.IsInitialized())
            RuntimeManager.Init();
    }
}
Initialized Event
You can get notified when the Easy Mobile runtime has been initialized by subscribing to the RuntimeManager.Initialized event.
Normally you wouldn't have to worry about this initialization status, provided that the Auto Runtime Initialization feature has been enabled or you perform manual initialization as soon as the app launches. But this should come in handy when you need to access the Easy Mobile API very early, as soon as the initialization finishes.
// Subscribe to events in the OnEnable method of a MonoBehavior script
void OnEnable()
{
    RuntimeManager.Initialized += OnEMRuntimeInitialized;    // get notified when Easy Mobile runtime has been initialized
}

// Unsubscribe
void OnDisable()
{
    RuntimeManager.Initialized -= OnEMRuntimeInitialized;
}

// Event handler
void OnEMRuntimeInitialized()
{
    Debug.Log("Easy Mobile runtime has been initialized!");
}
Scripting API
After initializing Easy Mobile you can use its scripting API, which is written in C#. Note that the API is put under the namespace EasyMobile so you need to add the following statement to the top of your scripts to access it.
// Put this on top of your scripts to use Easy Mobile scripting API
using EasyMobile;
Easy Mobile's API is cross-platform so you can use the same code for both iOS and Android. You can find the API reference here.
Testing
Most of Easy Mobile's functionalities are mobile-specific which may not work properly within the Unity editor. Therefore you should always perform testing on actual iOS or Android devices.
Using the Demo App
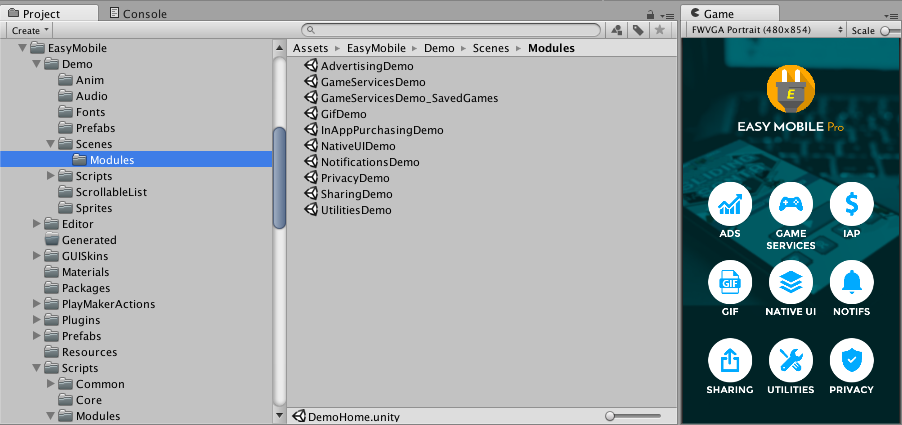
Easy Mobile comes with a demo app that you can use to quickly test each module's operation after configuring, even before writing any code! The demo app is located at folder Assets/EasyMobile/Demo. Its scenes are in the subfolder Scenes, you can build all scenes or only scenes that you want to test. Its scripts are in the subfolder Scripts, which you can refer to for an example of how Easy Mobile API can be used.
Integration with 3rd-party SDKs
Easy Mobile works with a wide range of 3rd party SDKs for its functionalities, e.g. the Google Mobile Ads plugin for AdMob ads, the Google Play Games plugin for game services, the OneSignal plugin for push notifications, etc. You import these 3rd party SDKs into your project to use them with certain modules of Easy Mobile. Once a relevant plugin is imported, Easy Mobile automatically detects its presence and updates its settings UI accordingly to allow you access to the corresponding module or feature. Detailed instructions will be included in the chapter dedicated to each module.
If you no longer want to use a 3rd party SDK, remember to disable the Easy Mobile module that requires it before removing the SDK to avoid errors. You can then re-enable the module if needed.
Using PlayMaker Actions
Easy Mobile is officially compatible with PlayMaker, with more than 100 custom actions ready to be used. You can install these actions from menu Window > Easy Mobile > Install PlayMaker Actions.
When installing the PlayMaker actions, a demo app will also be imported at Assets/EasyMobile/Demo/PlayMakerDemo. This demo is a copy of our main demo app, rebuilt using PlayMaker actions instead of C# scripts. You can take it as an example to get an insight into how Easy Mobile's PlayMaker actions can be used in practice. Apart from installing PlayMaker (obviously), you need to do a few more setup steps as described below before running this demo app.
Installing the Unity UI add-on for PlayMaker
Our PlayMaker demo app uses the Unity UI system, so you need to install the Unity UI add-on for PlayMaker.
Importing PlayMakerGlobals
The demo app uses global PlayMaker variables and events, so you need to import them before running the app.
If you project is new and doesn't have any PlayMakerGlobals (in the Assets/PlayMaker/Resources folder), simply copy our Globals over by these steps:
- Double-click the PlayMakerGlobals.unitypackage in the Assets/EasyMobile/Demo/PlayMakerDemo folder.
- Locate the newly created file PlayMakerGlobals_EXPORTED.asset right under the Assets folder.
- Rename the file to PlayMakerGlobals.asset and move it to the Assets/PlayMaker/Resources folder.
If you project already contains some global PlayMaker variables and events (a PlayMakerGlobals.asset file exists in the folder Assets/PlayMaker/Resources), you can merge these with our demo's Globals using PlayMaker's Import Globals tool: go to menu PlayMaker > Tools > Import Globals and select the PlayMakerGlobals.unitypackage in the Assets/EasyMobile/Demo/PlayMakerDemo folder.
With the PlayMaker demo app, we perform the Easy Mobile initialization using a FSM in the DemoHome_PlayMaker scene so you should always build this scene when using this demo app.
Requirements
Easy Mobile requires:
- Unity 2018.4.10 or newer.
- Xcode 12 or newer.
- iOS 9.0 or newer.
- Android 5.0 (API Level 21) or newer.